
Showing posts with label Blogger widgets. Show all posts
Showing posts with label Blogger widgets. Show all posts
Hello Friends I am gona to show you how to add social sharing button bellow post title in blogger.
<b:if cond='data:blog.pageType == "item"'>
<table border='0'>
<tr>
<td><div style='margin-right:5px;'>
<g:plusone expr:href='data:post.url' size='medium'/>
</div>
</td>
<td><div style='padding-top:6px;'>
<script type='text/javascript'>
tweetmeme_style = "compact";
</script>
<script src='http://tweetmeme.com/i/scripts/button.js' type='text/javascript'/>
</div></td>
<td><div style='margin-right:25px;'>
<script expr:src='"http://www.stumbleupon.com/hostedbadge.php?s=1&r=" + data:post.url'/></div>
</td>
<td><div style='margin-right:25px;'>
<div id='fb-root'/><script src='http://connect.facebook.net/en_US/all.js#xfbml=1'/><fb:like font='' href='' layout='button_count' send='true' show_faces='false' width='40px'/>
</div>
</td>
<td>
<!-- AddThis Button BEGIN -->
<div class="addthis_toolbox addthis_default_style ">
<a class="addthis_counter addthis_pill_style"></a>
</div>
<script type="text/javascript" src="http://s7.addthis.com/js/250/addthis_widget.js"></script>
<!-- AddThis Button END -->
</td>
</tr>
</table> </b:if><br/>
5. Next search for </head>
6. and just above it paste the following code,
How to Add This Widget.
- Go To Blogger > Design > Edit HTML
- Backup your template
- Search for <data:post.body/>
- and just above it paste the code given below,
<b:if cond='data:blog.pageType == "item"'>
<table border='0'>
<tr>
<td><div style='margin-right:5px;'>
<g:plusone expr:href='data:post.url' size='medium'/>
</div>
</td>
<td><div style='padding-top:6px;'>
<script type='text/javascript'>
tweetmeme_style = "compact";
</script>
<script src='http://tweetmeme.com/i/scripts/button.js' type='text/javascript'/>
</div></td>
<td><div style='margin-right:25px;'>
<script expr:src='"http://www.stumbleupon.com/hostedbadge.php?s=1&r=" + data:post.url'/></div>
</td>
<td><div style='margin-right:25px;'>
<div id='fb-root'/><script src='http://connect.facebook.net/en_US/all.js#xfbml=1'/><fb:like font='' href='' layout='button_count' send='true' show_faces='false' width='40px'/>
</div>
</td>
<td>
<!-- AddThis Button BEGIN -->
<div class="addthis_toolbox addthis_default_style ">
<a class="addthis_counter addthis_pill_style"></a>
</div>
<script type="text/javascript" src="http://s7.addthis.com/js/250/addthis_widget.js"></script>
<!-- AddThis Button END -->
</td>
</tr>
</table> </b:if><br/>
5. Next search for </head>
6. and just above it paste the following code,
<script src='http://apis.google.com/js/plusone.js' type='text/javascript'> {lang: 'en-US'} </script>
7. Save your template and you are done!
Hi friends today i am publishing a great tool.The widget below automatically turns the square edges of your image into rounded corners. The rounder corner pixel size can easily be adjusted. Once you submit the image, you will be taken to next window where you can set border radius size along with image quality and background colours. You can choose to set a background or keep the background transparent. You can also choose which of the four borders you wish to be curved and which should be left as default. You can either upload the image, photo or picture from your computer or you can enter the Image direct link/URL.

You don't need a Photoshop or any other software or tech knowledge to round your images.If you are creating an object using CSS then better apply the following property to produce rounded corners.
border-radius:10px;
-moz-border-radius:10px;
-webkit-border-radius:10px;
This widget is a coutesy of roundpic.
You don't need a Photoshop or any other software or tech knowledge to round your images.If you are creating an object using CSS then better apply the following property to produce rounded corners.
border-radius:10px;
-moz-border-radius:10px;
-webkit-border-radius:10px;
Tool for Rounding Your Images
This widget is a coutesy of roundpic.
Hi Friends i have founded a new sticky bar for blogger with close message or button.This is a new kind of sticky bar.Many webmaster have search for this.Today i will let you that how to apply it on a blog/website.While viewing one of the Wordpress Blogs I found this button next to their updates bar. I managed somehow to fetch the script half broken. Making it work with blogger template was difficult because blogspot templates are programmed via XML and the rules of XML are really harsh when it comes to Character case. Debugging the script was difficult but Alhamdulillah the hard work paid off. You can see it Live just to the right of my Stickybar at the top. I am excited to share it with you all. Lets get to work!

4. Just above it paste the following CSS code,
5. Next search for </head> and paste the following Javascript code just above it
<script type='text/javascript'>
//<![CDATA[
var mbt_arr = new Array();
var mbt_clear = new Array();
function mbtFloat(mbt) {
mbt_arr[mbt_arr.length] = this;
var mbtpointer = eval(mbt_arr.length-1);
this.pagetop = 0;
this.cmode = (document.compatMode && document.compatMode!="BackCompat") ? document.documentElement : document.body;
this.mbtsrc = document.all? document.all[mbt] : document.getElementById(mbt);
this.mbtsrc.height = this.mbtsrc.offsetHeight;
this.mbtheight = this.cmode.clientHeight;
this.mbtoffset = mbtGetOffsetY(mbt_arr[mbtpointer]);
var mbtbar = 'mbt_clear['+mbtpointer+'] = setInterval("mbtFloatInit(mbt_arr['+mbtpointer+'])",1);';
mbtbar = mbtbar;
eval(mbtbar);
}
function mbtGetOffsetY(mbt) {
var mtaTotOffset = parseInt(mbt.mbtsrc.offsetTop);
var parentOffset = mbt.mbtsrc.offsetParent;
while ( parentOffset != null ) {
mbtTotOffset += parentOffset.offsetTop;
parentOffset = parentOffset.offsetParent;
}
return mbtTotOffset;
}
function mbtFloatInit(mbt) {
mbt.pagetop = mbt.cmode.scrollTop;
mbt.mbtsrc.style.top = mbt.pagetop - mbt.mbtoffset + "px";
}
function closeTopAds() {
document.getElementById("mbt_bar").style.visibility = "hidden";
}
//]]>
</script>
6. Finally search for <body> and just below it paste the following HTML code
<div id='mbt_bar'> WRITE YOUR TEXT HERE
<span style='padding:0px; float:right'>
<img align='absmiddle' border='0' onClick='closeTopAds();return false;' src='https://blogger.googleusercontent.com/img/b/R29vZ2xl/AVvXsEjalQ1Mdrpeo5NW5VSrXDKVeGMRCCraZQJ6Gi7W2srAHhhgOAFr2UXCc8es4Dzsn6c0f2rmjvCyO11nfKiRYFYCIVoOaaXmvcQwD8yX7AJQ6vTub6nwGrtm8DVdr9uIEXQWIfKl_baELv8/s400/cancel.png' style='cursor:hand;cursor:pointer;'/></span></div>
<br/><br/>
To write any updates or anythig, just replace the Green highlighted text with your message. If you wish to change the Close button image then simply replace the bolded black link with your button's link.
7. Save your template
8. You are all done!
Steps To Create Sticky Bar.
Follow these easy steps:
- Go To Blogger > Design > Edit HTML
- Backup your template
- Search for this
]]></b:skin>
4. Just above it paste the following CSS code,
#mbt_bar{
background:#333 url('https://blogger.googleusercontent.com/img/b/R29vZ2xl/AVvXsEiGIoHDM3XLojZzLETaHvmhLRMQ4xob-Vb_yppzxgWAFKq2KxeS8TmL1gY_ie2L9I7ZHI9Qp3Vc9bYx_JF3dK-dGs3u6xG4kvjWrYuACLGG8ivgWkS7YYRSkIzQmOdDhv0bjAdhnLz5p-U/s400/stickybar.png') repeat-x;
width:100%;
margin:0 auto;
text-align:center;
padding:0px 0;
border-bottom: 1px solid #888888;
-moz-box-shadow: #666666 0px 1px 3px;
-webkit-box-shadow: #666666 0px 1px 3px;
box-shadow: #666666 0px 1px 3px;
z-index: 999;
height: 28px; position:fixed;
line-height: 1.85em;
vertical-align: baseline;
letter-spacing: 1px;
color:#fff;
font-size:13px;
font-weight:bold;
font-family: arial,"Helvetica",sans-serif;
}
#mbt_bar a{
text-decoration:underline;
color:#E2E504;
}
#mbt_bar a:hover{
text-decoration:none;
}
#mbt_bar p {margin:0; list-style:none;}
#mbt_bar img {vertical-align: middle;
margin-right: 6px;}
background:#333 url('https://blogger.googleusercontent.com/img/b/R29vZ2xl/AVvXsEiGIoHDM3XLojZzLETaHvmhLRMQ4xob-Vb_yppzxgWAFKq2KxeS8TmL1gY_ie2L9I7ZHI9Qp3Vc9bYx_JF3dK-dGs3u6xG4kvjWrYuACLGG8ivgWkS7YYRSkIzQmOdDhv0bjAdhnLz5p-U/s400/stickybar.png') repeat-x;
width:100%;
margin:0 auto;
text-align:center;
padding:0px 0;
border-bottom: 1px solid #888888;
-moz-box-shadow: #666666 0px 1px 3px;
-webkit-box-shadow: #666666 0px 1px 3px;
box-shadow: #666666 0px 1px 3px;
z-index: 999;
height: 28px; position:fixed;
line-height: 1.85em;
vertical-align: baseline;
letter-spacing: 1px;
color:#fff;
font-size:13px;
font-weight:bold;
font-family: arial,"Helvetica",sans-serif;
}
#mbt_bar a{
text-decoration:underline;
color:#E2E504;
}
#mbt_bar a:hover{
text-decoration:none;
}
#mbt_bar p {margin:0; list-style:none;}
#mbt_bar img {vertical-align: middle;
margin-right: 6px;}
5. Next search for </head> and paste the following Javascript code just above it
<script type='text/javascript'>
//<![CDATA[
var mbt_arr = new Array();
var mbt_clear = new Array();
function mbtFloat(mbt) {
mbt_arr[mbt_arr.length] = this;
var mbtpointer = eval(mbt_arr.length-1);
this.pagetop = 0;
this.cmode = (document.compatMode && document.compatMode!="BackCompat") ? document.documentElement : document.body;
this.mbtsrc = document.all? document.all[mbt] : document.getElementById(mbt);
this.mbtsrc.height = this.mbtsrc.offsetHeight;
this.mbtheight = this.cmode.clientHeight;
this.mbtoffset = mbtGetOffsetY(mbt_arr[mbtpointer]);
var mbtbar = 'mbt_clear['+mbtpointer+'] = setInterval("mbtFloatInit(mbt_arr['+mbtpointer+'])",1);';
mbtbar = mbtbar;
eval(mbtbar);
}
function mbtGetOffsetY(mbt) {
var mtaTotOffset = parseInt(mbt.mbtsrc.offsetTop);
var parentOffset = mbt.mbtsrc.offsetParent;
while ( parentOffset != null ) {
mbtTotOffset += parentOffset.offsetTop;
parentOffset = parentOffset.offsetParent;
}
return mbtTotOffset;
}
function mbtFloatInit(mbt) {
mbt.pagetop = mbt.cmode.scrollTop;
mbt.mbtsrc.style.top = mbt.pagetop - mbt.mbtoffset + "px";
}
function closeTopAds() {
document.getElementById("mbt_bar").style.visibility = "hidden";
}
//]]>
</script>
6. Finally search for <body> and just below it paste the following HTML code
<div id='mbt_bar'> WRITE YOUR TEXT HERE
<span style='padding:0px; float:right'>
<img align='absmiddle' border='0' onClick='closeTopAds();return false;' src='https://blogger.googleusercontent.com/img/b/R29vZ2xl/AVvXsEjalQ1Mdrpeo5NW5VSrXDKVeGMRCCraZQJ6Gi7W2srAHhhgOAFr2UXCc8es4Dzsn6c0f2rmjvCyO11nfKiRYFYCIVoOaaXmvcQwD8yX7AJQ6vTub6nwGrtm8DVdr9uIEXQWIfKl_baELv8/s400/cancel.png' style='cursor:hand;cursor:pointer;'/></span></div>
<br/><br/>
To write any updates or anythig, just replace the Green highlighted text with your message. If you wish to change the Close button image then simply replace the bolded black link with your button's link.
7. Save your template
8. You are all done!
Visit your blog to see it fixed to the top just beautifully with a close button waiting to be clicked!
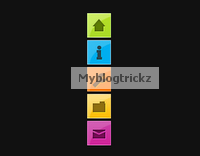 Hi Friends.In this post i have a very stylish and colorful menu for you.You can fix to the side of the page on your Blogger blog.The menu will stay in place even when the reader scrolls down yet doesn't interfere with the content.The menu has 5 icons that on hover scroll out to reveal their purpose, so for example the home icon on hover scrolls out the word 'Home'.The 5 icons are for Home, About, Services, Portfolio and Contact Us.While you cant change the icons, you can change the text for each icon for example the portfolio icon could be changed to archive.
The menu is made up almost completely of Css3 with just one image and is quick and easy to install.All the credit for the menu goes to the awesome Tutorialzine, we have covered many of their tutorials previously.Below you can see a live demo, hover over the icons to see the scroll out effect.
How To Add The Fixed Navigation Menu
- Go To Blogger>>>>Design>>>>Edit HTML
- CTRL+F To Find ]]></b:skin>
- Copy And Paste Below Code Just Before/Above ]]></b:skin>
/* CSS Style for Horizontal Menu - info @ http://www.myblogtrickz.blogspot.com*/ #hor { list-style:none; padding:0; margin:0; } #hor li { float:left; padding:5px; } #hor a { display:block; height: 12px; text-indent:-999em; } #hor a.home { width:46px; background:url(vHome.gif) no-repeat 0 0; } #hor a.download { width:94px; background:url(vDownload.gif) no-repeat 0 0; } #hor a.contact { width:74px; background:url(vContact.gif) no-repeat 0 0; } /* CSS Style for Vertical Menu */ #ver { list-style:none; padding:0; margin:0; } #ver li { padding:2px; } #ver li a { display:block; height:12px; text-indent:-999em; } #ver a.home { width:47px; background:url(hHome.gif) no-repeat 0 0; } #ver a.download { width:95px; background:url(hDownload.gif) no-repeat 0 0; } #ver a.contact { width:74px; background:url(hContact.gif) no-repeat 0 0; } .clear { clear:both; } *{ /* A universal CSS reset */ margin:0; padding:0; } #navigationMenu body{ font-size:14px; color:#666; background:#111 no-repeat; /* CSS3 Radial Gradients */ background-image:-moz-radial-gradient(center -100px 45deg, circle farthest-corner, #444 150px, #111 300px); background-image:-webkit-gradient(radial, 50% 0, 150, 50% 0, 300, from(#444), to(#111)); font-family:Arial, Helvetica, sans-serif; } #navigationMenu li{ list-style:none; height:39px; padding:2px; width:40px; } #navigationMenu span{ /* Container properties */ width:0; left:38px; padding:0; position:absolute; overflow:hidden; /* Text properties */ font-family:'Myriad Pro',Arial, Helvetica, sans-serif; font-size:18px; font-weight:bold; letter-spacing:0.6px; white-space:nowrap; line-height:39px; /* CSS3 Transition: */ -webkit-transition: 0.25s; /* Future proofing (these do not work yet): */ -moz-transition: 0.25s; transition: 0.25s; } #navigationMenu a{ background:url('https://blogger.googleusercontent.com/img/b/R29vZ2xl/AVvXsEj-91WShKHwrJqyru1HnCydvlwKP1titV5CEaYgAxXxzoVHdoa1_w0u3uueclKWveBI0SnXWVh8bJdLn7ebuk1-75ky6Wb6yegdFs3-w3rN31cYtGKu2bFMNLoYoO4p4p20pAjA3ZhuBfA/s1600/navigation.jpg') no-repeat; height:39px; width:38px; display:block; position:relative; } /* General hover styles */ #navigationMenu a:hover span{ width:auto; padding:0 20px;overflow:visible; } #navigationMenu a:hover{ text-decoration:none; /* CSS outer glow with the box-shadow property */ -moz-box-shadow:0 0 5px #9ddff5; -webkit-box-shadow:0 0 5px #9ddff5; box-shadow:0 0 5px #9ddff5; } /* Green Button */ #navigationMenu .home { background-position:0 0;} #navigationMenu .home:hover { background-position:0 -39px;} #navigationMenu .home span{ background-color:#7da315; color:#3d4f0c; text-shadow:1px 1px 0 #99bf31; } /* Blue Button */ #navigationMenu .about { background-position:-38px 0;} #navigationMenu .about:hover { background-position:-38px -39px;} #navigationMenu .about span{ background-color:#1e8bb4; color:#223a44; text-shadow:1px 1px 0 #44a8d0; } /* Orange Button */ #navigationMenu .services { background-position:-76px 0;} #navigationMenu .services:hover { background-position:-76px -39px;} #navigationMenu .services span{ background-color:#c86c1f; color:#5a3517; text-shadow:1px 1px 0 #d28344; } /* Yellow Button */ #navigationMenu .portfolio { background-position:-114px 0;} #navigationMenu .portfolio:hover{ background-position:-114px -39px;} #navigationMenu .portfolio span{ background-color:#d0a525; color:#604e18; text-shadow:1px 1px 0 #d8b54b; } /* Purple Button */ #navigationMenu .contact { background-position:-152px 0;} #navigationMenu .contact:hover { background-position:-152px -39px;} #navigationMenu .contact span{ background-color:#af1e83; color:#460f35; text-shadow:1px 1px 0 #d244a6; } /*End menu css - info @ http://www.myblogtrickz.blogspot.com */
- Save your template, that's the Css added now for the html.
- Return to your blogs Design or Layout page and click Add A Gadget >>> HTML/Javascript .
- Copy and paste the following code into the HTML/Javascript gadget :
<div style='position: fixed; top: 40%; left: 0%;'/> <ul id="navigationMenu"> <li> <a class="Home" href="http://www.myblogtrickz.blogspot.com"> <span>Home</span> </a> </li> <li> <a class="about" href="http://www.myblogtrickz.blogspot.com"> <span>About</span> </a> </li> <li> <a class="services" href="http://www.myblogtrickz.blogspot.com"> <span>Services</span> </a> </li> <li> <a class="portfolio" href="http://www.myblogtrickz.blogspot.com"> <span>Portfolio</span> </a> </li> <li> <a class="contact" href="http://www.myblogtrickz.blogspot.com"> <span>Contact us</span> </a> </li> </ul> </div><a href="http://www.myblogtrickz.blogspot.com" target="_blank"><small>Get The Fixed Menu Gadget</small></a>
Note- Change the URLs in Blue with your links and You can change the scroll out text in Green above.
Now Save the Gadget.And see your website/blog.
Dont Forget to share this.
Dont Forget to share this.
 So many blogs and websites have implemented a pop up subscription form for their newsletter.I'm sure you have seen it, you can also land it on a site and after a few seconds a form appears asking for your Email to subscribe.While these can annoy some people they have been proven to have a dramatic effect on the numbers of subscribers.In this post i will show you how to add a similar form to your Blogger blog but with a form to subscribe to your blog via Email Rss provided by feedburner.The form is a one time pop up so if someone visits your blog every day it will remember they visited before and not show the form again.
This tutorial was originally posted on the excellent Simplex Design blog so make sure to check them out.Below you can see a live demo.
Live Demo
How To Add The Pop Up Subscription
- Go To Blogger-->Design-->Edit HTML
- CTRL+F To Find ]]></b:skin>
- Copy And Paste Below Code Just Above/Before ]]></b:skin>
/*Subscription Pop Up Css*/
#popupContactClose{
cursor: pointer;
text-decoration:none;
}
#backgroundPopup{
display:none;
position:fixed;
_position:absolute; /* hack for internet explorer 6*/
height:100%;
width:100%;
top:0;
left:0;
background:#000000;
border:1px solid #cecece;
z-index:1;
}
#popupContact{
display:none;
position:fixed;
_position:absolute; /* hack for internet explorer 6*/
height:384px;
width:408px;
background:#FFFFFF;
border:2px solid #cecece;
z-index:2;
padding:12px;
font-size:13px;
}
#popupContact h1{
text-align:left;
color:#6FA5FD;
font-size:22px;
font-weight:700;
border-bottom:1px dotted #D3D3D3;
padding-bottom:2px;
margin-bottom:20px;
}
#popupContactClose{
font-size:14px;
line-height:14px;
right:6px;
top:4px;
position:absolute;
color:#6fa5fd;
font-weight:700;
display:block;
}
/*End Subscription Pop Up Css @ http://www.myblogtrickz.blogspot.com */
#popupContactClose{
cursor: pointer;
text-decoration:none;
}
#backgroundPopup{
display:none;
position:fixed;
_position:absolute; /* hack for internet explorer 6*/
height:100%;
width:100%;
top:0;
left:0;
background:#000000;
border:1px solid #cecece;
z-index:1;
}
#popupContact{
display:none;
position:fixed;
_position:absolute; /* hack for internet explorer 6*/
height:384px;
width:408px;
background:#FFFFFF;
border:2px solid #cecece;
z-index:2;
padding:12px;
font-size:13px;
}
#popupContact h1{
text-align:left;
color:#6FA5FD;
font-size:22px;
font-weight:700;
border-bottom:1px dotted #D3D3D3;
padding-bottom:2px;
margin-bottom:20px;
}
#popupContactClose{
font-size:14px;
line-height:14px;
right:6px;
top:4px;
position:absolute;
color:#6fa5fd;
font-weight:700;
display:block;
}
/*End Subscription Pop Up Css @ http://www.myblogtrickz.blogspot.com */
- CTRL+F To Find </head>
- Now Copy And Paste This Code Directly Above / Before </head>
<!--Pop Up Subscription-->
<script src='https://ajax.googleapis.com/ajax/libs/jquery/1.5.0/jquery.min.js' type='text/javascript'/>
<script src='http://dinhquanghuy.110mb.com/jquery.cookie.js' type='text/javascript'/>
<script type='text/javascript'>
var popupStatus = 0;
//loading popup with jQuery magic!
function loadPopup(){
centerPopup();
//loads popup only if it is disabled
if(popupStatus==0){
$("#backgroundPopup").css({
"opacity": "0.7"
});
$("#backgroundPopup").fadeIn("slow");
$("#popupContact").fadeIn("slow");
popupStatus = 1;
}
}
//disabling popup with jQuery magic!
function disablePopup(){
//disables popup only if it is enabled
if(popupStatus==1){
$("#backgroundPopup").fadeOut("slow");
$("#popupContact").fadeOut("slow");
popupStatus = 0;
}
}
//centering popup
function centerPopup(){
//request data for centering
var windowWidth = document.documentElement.clientWidth;
var windowHeight = document.documentElement.clientHeight;
var windowscrolltop = document.documentElement.scrollTop;
var windowscrollleft = document.documentElement.scrollLeft;
var popupHeight = $("#popupContact").height();
var popupWidth = $("#popupContact").width();
var toppos = windowHeight/2-popupHeight/2+windowscrolltop;
var leftpos = windowWidth/2-popupWidth/2+windowscrollleft;
//centering
$("#popupContact").css({
"position": "absolute",
"top": toppos,
"left": leftpos
});
//only need force for IE6
$("#backgroundPopup").css({
"height": windowHeight
});
}
//CONTROLLING EVENTS IN jQuery
$(document).ready(function(){
if ($.cookie("anewsletter") != 1) {
//load popup
setTimeout("loadPopup()",5000);
}
//CLOSING POPUP
//Click the x event!
$("#popupContactClose").click(function(){
disablePopup();
$.cookie("anewsletter", "1", { expires: 7 });
});
//Click out event!
$("#backgroundPopup").click(function(){
disablePopup();
$.cookie("anewsletter", "1", { expires: 7 });
});
//Press Escape event!
$(document).keypress(function(e){
if(e.keyCode==27 && popupStatus==1){
disablePopup();
$.cookie("anewsletter", "1", { expires: 7 });
}
});
});
</script>
<!--End Pop Up Subscription @ http://myblogtrickz.blogspot.com -->
<script src='https://ajax.googleapis.com/ajax/libs/jquery/1.5.0/jquery.min.js' type='text/javascript'/>
<script src='http://dinhquanghuy.110mb.com/jquery.cookie.js' type='text/javascript'/>
<script type='text/javascript'>
var popupStatus = 0;
//loading popup with jQuery magic!
function loadPopup(){
centerPopup();
//loads popup only if it is disabled
if(popupStatus==0){
$("#backgroundPopup").css({
"opacity": "0.7"
});
$("#backgroundPopup").fadeIn("slow");
$("#popupContact").fadeIn("slow");
popupStatus = 1;
}
}
//disabling popup with jQuery magic!
function disablePopup(){
//disables popup only if it is enabled
if(popupStatus==1){
$("#backgroundPopup").fadeOut("slow");
$("#popupContact").fadeOut("slow");
popupStatus = 0;
}
}
//centering popup
function centerPopup(){
//request data for centering
var windowWidth = document.documentElement.clientWidth;
var windowHeight = document.documentElement.clientHeight;
var windowscrolltop = document.documentElement.scrollTop;
var windowscrollleft = document.documentElement.scrollLeft;
var popupHeight = $("#popupContact").height();
var popupWidth = $("#popupContact").width();
var toppos = windowHeight/2-popupHeight/2+windowscrolltop;
var leftpos = windowWidth/2-popupWidth/2+windowscrollleft;
//centering
$("#popupContact").css({
"position": "absolute",
"top": toppos,
"left": leftpos
});
//only need force for IE6
$("#backgroundPopup").css({
"height": windowHeight
});
}
//CONTROLLING EVENTS IN jQuery
$(document).ready(function(){
if ($.cookie("anewsletter") != 1) {
//load popup
setTimeout("loadPopup()",5000);
}
//CLOSING POPUP
//Click the x event!
$("#popupContactClose").click(function(){
disablePopup();
$.cookie("anewsletter", "1", { expires: 7 });
});
//Click out event!
$("#backgroundPopup").click(function(){
disablePopup();
$.cookie("anewsletter", "1", { expires: 7 });
});
//Press Escape event!
$(document).keypress(function(e){
if(e.keyCode==27 && popupStatus==1){
disablePopup();
$.cookie("anewsletter", "1", { expires: 7 });
}
});
});
</script>
<!--End Pop Up Subscription @ http://myblogtrickz.blogspot.com -->
- CTRL+F To Find </body>
- Copy and Paste the following code Directly Above / Before </body>
<div id='popupContact'>
<a id='popupContactClose'>x</a>
<h1>Get Our Latest Posts Via Email - It's Free</h1>
<p id='contactArea'><form action='http://feedburner.google.com/fb/a/mailverify' method='post' onsubmit='window.open(&,"gl";apos;http://feedburner.google.com/fb/a/mailverify?uri=Myblogtrickz', 'popupwindow', 'scrollbars=yes,width=550,height=520');return true' style='border:1px solid #ccc;padding:3px;text-align:center;' target='popupwindow'><p>Enter your email address:</p><p><input name='email' style='width:140px' type='text'/></p><input name='uri' type='hidden' value='Myblogtrickz'/><input name='loc' type='hidden' value='en_US'/><input type='submit' value='Subscribe'/><p>Delivered by <a href='http://feedburner.google.com' target='_blank'>FeedBurner</a></p></form></p>
</div>
<div id='backgroundPopup'/>
<a id='popupContactClose'>x</a>
<h1>Get Our Latest Posts Via Email - It's Free</h1>
<p id='contactArea'><form action='http://feedburner.google.com/fb/a/mailverify' method='post' onsubmit='window.open(&,"gl";apos;http://feedburner.google.com/fb/a/mailverify?uri=Myblogtrickz', 'popupwindow', 'scrollbars=yes,width=550,height=520');return true' style='border:1px solid #ccc;padding:3px;text-align:center;' target='popupwindow'><p>Enter your email address:</p><p><input name='email' style='width:140px' type='text'/></p><input name='uri' type='hidden' value='Myblogtrickz'/><input name='loc' type='hidden' value='en_US'/><input type='submit' value='Subscribe'/><p>Delivered by <a href='http://feedburner.google.com' target='_blank'>FeedBurner</a></p></form></p>
</div>
<div id='backgroundPopup'/>
Remember-You need to change our feedburner username with yours.The username for your feed can be found at the end of your feed URL.For example the our feedburner URL is http://feeds.feedburner.com/MakingDiffrent , with Myblogtrickz being the username.
That's it all thanks go to Simplex Design.
That's all You have done it.
Drop your comments and questions below. :)
Drop your comments and questions below. :)

Welcome Your Visitors with new Snow falling.This is a simple script which can add your Blog/Website an attractive look.
How To Add Colorful Snow Falling in Blogger
- Go To Blogger > Design
- Choose HTML/Javascript gadget
- Copy n Paste Below Code Into It
<script type="text/javascript">
//Configure below to change URL path to the snow image
var snowsrc="https://blogger.googleusercontent.com/img/b/R29vZ2xl/AVvXsEggpswxEoy92_hdZOr7SqSgxpIWVSqmTs2VhCyFnfNXQi97hOsVLylUyr4hI4pIjwTTtjeTiJY9vOujgy26PqXYYx9eWDFguryxhmttEvyZFzV4IAYQ-yPo2uVizNH_NcRzH-V_Q9Jv_4BR/s1600/snow.gif"
// Configure below to change number of snow to render
var no = 15;
// Configure whether snow should disappear after x seconds (0=never):
var hidesnowtime = 0;
// Configure how much snow should drop down before fading ("windowheight" or "pageheight")
var snowdistance = "pageheight";
///////////Stop Config//////////////////////////////////
var ie4up = (document.all) ? 1 : 0;
var ns6up = (document.getElementById&&!document.all) ? 1 : 0;
function iecompattest(){
return (document.compatMode && document.compatMode!="BackCompat")? document.documentElement : document.body
}
var dx, xp, yp; // coordinate and position variables
var am, stx, sty; // amplitude and step variables
var i, doc_width = 800, doc_height = 600;
if (ns6up) {
doc_width = self.innerWidth;
doc_height = self.innerHeight;
} else if (ie4up) {
doc_width = iecompattest().clientWidth;
doc_height = iecompattest().clientHeight;
}
dx = new Array();
xp = new Array();
yp = new Array();
am = new Array();
stx = new Array();
sty = new Array();
snowsrc=(snowsrc.indexOf("dynamicdrive.com")!=-1)? "https://blogger.googleusercontent.com/img/b/R29vZ2xl/AVvXsEggpswxEoy92_hdZOr7SqSgxpIWVSqmTs2VhCyFnfNXQi97hOsVLylUyr4hI4pIjwTTtjeTiJY9vOujgy26PqXYYx9eWDFguryxhmttEvyZFzV4IAYQ-yPo2uVizNH_NcRzH-V_Q9Jv_4BR/s1600/snow.gif" : snowsrc
for (i = 0; i < no; ++ i) {
dx[i] = 0; // set coordinate variables
xp[i] = Math.random()*(doc_width-50); // set position variables
yp[i] = Math.random()*doc_height;
am[i] = Math.random()*20; // set amplitude variables
stx[i] = 0.02 + Math.random()/10; // set step variables
sty[i] = 0.7 + Math.random(); // set step variables
if (ie4up||ns6up) {
if (i == 0) {
document.write("<div id=\"dot"+ i +"\" style=\"POSITION: absolute; Z-INDEX: "+ i +"; VISIBILITY: visible; TOP: 15px; LEFT: 15px;\"><a href=\"http://dynamicdrive.com\"><img src='"+snowsrc+"' border=\"0\"><\/a><\/div>");
} else {
document.write("<div id=\"dot"+ i +"\" style=\"POSITION: absolute; Z-INDEX: "+ i +"; VISIBILITY: visible; TOP: 15px; LEFT: 15px;\"><img src='"+snowsrc+"' border=\"0\"><\/div>");
}
}
}
function snowIE_NS6() { // IE and NS6 main animation function
doc_width = ns6up?window.innerWidth-10 : iecompattest().clientWidth-10;
doc_height=(window.innerHeight && snowdistance=="windowheight")? window.innerHeight : (ie4up && snowdistance=="windowheight")? iecompattest().clientHeight : (ie4up && !window.opera && snowdistance=="pageheight")? iecompattest().scrollHeight : iecompattest().offsetHeight;
for (i = 0; i < no; ++ i) { // iterate for every dot
yp[i] += sty[i];
if (yp[i] > doc_height-50) {
xp[i] = Math.random()*(doc_width-am[i]-30);
yp[i] = 0;
stx[i] = 0.02 + Math.random()/10;
sty[i] = 0.7 + Math.random();
}
dx[i] += stx[i];
document.getElementById("dot"+i).style.top=yp[i]+"px";
document.getElementById("dot"+i).style.left=xp[i] + am[i]*Math.sin(dx[i])+"px";
}
snowtimer=setTimeout("snowIE_NS6()", 10);
}
function hidesnow(){
if (window.snowtimer) clearTimeout(snowtimer)
for (i=0; i<no; i++) document.getElementById("dot"+i).style.visibility="hidden"
}
if (ie4up||ns6up){
snowIE_NS6();
if (hidesnowtime>0)
setTimeout("hidesnow()", hidesnowtime*1000)
}
</script>
//Configure below to change URL path to the snow image
var snowsrc="https://blogger.googleusercontent.com/img/b/R29vZ2xl/AVvXsEggpswxEoy92_hdZOr7SqSgxpIWVSqmTs2VhCyFnfNXQi97hOsVLylUyr4hI4pIjwTTtjeTiJY9vOujgy26PqXYYx9eWDFguryxhmttEvyZFzV4IAYQ-yPo2uVizNH_NcRzH-V_Q9Jv_4BR/s1600/snow.gif"
// Configure below to change number of snow to render
var no = 15;
// Configure whether snow should disappear after x seconds (0=never):
var hidesnowtime = 0;
// Configure how much snow should drop down before fading ("windowheight" or "pageheight")
var snowdistance = "pageheight";
///////////Stop Config//////////////////////////////////
var ie4up = (document.all) ? 1 : 0;
var ns6up = (document.getElementById&&!document.all) ? 1 : 0;
function iecompattest(){
return (document.compatMode && document.compatMode!="BackCompat")? document.documentElement : document.body
}
var dx, xp, yp; // coordinate and position variables
var am, stx, sty; // amplitude and step variables
var i, doc_width = 800, doc_height = 600;
if (ns6up) {
doc_width = self.innerWidth;
doc_height = self.innerHeight;
} else if (ie4up) {
doc_width = iecompattest().clientWidth;
doc_height = iecompattest().clientHeight;
}
dx = new Array();
xp = new Array();
yp = new Array();
am = new Array();
stx = new Array();
sty = new Array();
snowsrc=(snowsrc.indexOf("dynamicdrive.com")!=-1)? "https://blogger.googleusercontent.com/img/b/R29vZ2xl/AVvXsEggpswxEoy92_hdZOr7SqSgxpIWVSqmTs2VhCyFnfNXQi97hOsVLylUyr4hI4pIjwTTtjeTiJY9vOujgy26PqXYYx9eWDFguryxhmttEvyZFzV4IAYQ-yPo2uVizNH_NcRzH-V_Q9Jv_4BR/s1600/snow.gif" : snowsrc
for (i = 0; i < no; ++ i) {
dx[i] = 0; // set coordinate variables
xp[i] = Math.random()*(doc_width-50); // set position variables
yp[i] = Math.random()*doc_height;
am[i] = Math.random()*20; // set amplitude variables
stx[i] = 0.02 + Math.random()/10; // set step variables
sty[i] = 0.7 + Math.random(); // set step variables
if (ie4up||ns6up) {
if (i == 0) {
document.write("<div id=\"dot"+ i +"\" style=\"POSITION: absolute; Z-INDEX: "+ i +"; VISIBILITY: visible; TOP: 15px; LEFT: 15px;\"><a href=\"http://dynamicdrive.com\"><img src='"+snowsrc+"' border=\"0\"><\/a><\/div>");
} else {
document.write("<div id=\"dot"+ i +"\" style=\"POSITION: absolute; Z-INDEX: "+ i +"; VISIBILITY: visible; TOP: 15px; LEFT: 15px;\"><img src='"+snowsrc+"' border=\"0\"><\/div>");
}
}
}
function snowIE_NS6() { // IE and NS6 main animation function
doc_width = ns6up?window.innerWidth-10 : iecompattest().clientWidth-10;
doc_height=(window.innerHeight && snowdistance=="windowheight")? window.innerHeight : (ie4up && snowdistance=="windowheight")? iecompattest().clientHeight : (ie4up && !window.opera && snowdistance=="pageheight")? iecompattest().scrollHeight : iecompattest().offsetHeight;
for (i = 0; i < no; ++ i) { // iterate for every dot
yp[i] += sty[i];
if (yp[i] > doc_height-50) {
xp[i] = Math.random()*(doc_width-am[i]-30);
yp[i] = 0;
stx[i] = 0.02 + Math.random()/10;
sty[i] = 0.7 + Math.random();
}
dx[i] += stx[i];
document.getElementById("dot"+i).style.top=yp[i]+"px";
document.getElementById("dot"+i).style.left=xp[i] + am[i]*Math.sin(dx[i])+"px";
}
snowtimer=setTimeout("snowIE_NS6()", 10);
}
function hidesnow(){
if (window.snowtimer) clearTimeout(snowtimer)
for (i=0; i<no; i++) document.getElementById("dot"+i).style.visibility="hidden"
}
if (ie4up||ns6up){
snowIE_NS6();
if (hidesnowtime>0)
setTimeout("hidesnow()", hidesnowtime*1000)
}
</script>
Make these changes:
- To set the number of snow balls edit the number 15
- To change the snow image replace the Blue link with yours
https://blogger.googleusercontent.com/img/b/R29vZ2xl/AVvXsEgdclspFhVFuvYRgY2NuEIkbW-7btFqxKTiY-XC_QWWIYytTkO423z54bnfIGi29kPyoxvx7dHqqQZx97KYW1d9CuaVo_Y4EwB6S-7Wo9Aa1LHA6cPJR8URR_kLC6koIKv-D0fUpPaDurGj/s1600/falling-snow.png
Why not some red colorful snow?
https://blogger.googleusercontent.com/img/b/R29vZ2xl/AVvXsEgKtpHn51kp8fuzXWgXMA7tMqmYGgpp-kZ6rjgyDYQyHdFg9mJcbvFsGwHYtefVeg3RDpFOXyWY_qEr0iqDWBBugWJK58h34oCsF9JbqOpUmZeeTbFVIIPmg8DqjLA0QMPf57v_fwKE5MXE/s1600/red-snow.png
You can replace the image with anything you wish. You can also display falling autumn leaves, falling new year message,falling diamonds or even falling hearts! Just play with the code and keep changing the styles.
- Save your widget and drag it to the top most position possible near header as shown below.

5. Click the orange save button on your page elements and you are all done!

Visit your blogs to see beautiful snow falling on your blog giving a Christmas touch of winter. Have fun!
Now You can Set Wordpress style Slides of Related Post on Blogger.The Widget will slide at the bottom of right corner of your page and will recommend related posts from your site to the visitor.Almost Every Wordpress popular sites will using this widgets.Now its your turn to use it.

How To Add This Widget In Blogger ?
- Go and Sign up for an account at Simple Reach. During Sign up, give the URL of your blog where you want this widget appear.
- Next Visit your Inbox to activate your account
- One your account page fill the easy instructions given there.
- They will give you a pictorial representation on what to do next. They will ask you to Download your Blogger template by going to Design > Edit HTML > Download Full Template. (I would advise that you first Backup your template and keep it in a safe place.)
- Then you will be asked to upload your template on their site. Do it and you will be taken to a new page where in step#5 you will get a link for the modified copy of your template. Simply download your new modified template from their site and upload it on Blogger.
- Your are all done!
It will take around 30 minutes to fully index all your pages. After the 30 minutes, you will be able to see the widget appearing on your blog. Note this the widget will appear only on your post pages not at homepage.
Hi,
We have Found new Blogger widgets for xmas it is very special widget.The countdown widget counts down to 25 December 2011 and in military time format by counting days, hours, minutes and seconds left for the coming Christmas event. It also alerts and wishes Christmas by generating a pop-up once the count down ends. The Script is provided by dynamic drive and it is styled was enhanced by MBT. This widget will be shared on each event here may it be Holi,New Year,etc. It is was very easy to install and customize it.Ths Script does not contain any ads.

We have Found new Blogger widgets for xmas it is very special widget.The countdown widget counts down to 25 December 2011 and in military time format by counting days, hours, minutes and seconds left for the coming Christmas event. It also alerts and wishes Christmas by generating a pop-up once the count down ends. The Script is provided by dynamic drive and it is styled was enhanced by MBT. This widget will be shared on each event here may it be Holi,New Year,etc. It is was very easy to install and customize it.Ths Script does not contain any ads.
Demo
<style style="text/css">
.lcdstyle{ /*Example CSS to create LCD countdown look*/
background-color:fff;
color:#FF3333;
font: bold 20px arial;
padding: 15px;
border:5px solid #0080ff;
border-radius:15px;
-moz-border-radius:15px;
-webkit-border-radius:15px;
box-shadow: 5px 5px 5px #CCCCCC;
}
.lcdstyle sup{ /*Example CSS to create LCD countdown look*/
font-size: 120%
}
</style>
<script type="text/javascript">
/***********************************************
* Dynamic Countdown script- © Dynamic Drive (http://www.dynamicdrive.com)
* This notice MUST stay intact for legal use
* Visit http://www.dynamicdrive.com/ for this script and 100s more.
***********************************************/
function cdtime(container, targetdate){
if (!document.getElementById || !document.getElementById(container)) return
this.container=document.getElementById(container)
this.currentTime=new Date()
this.targetdate=new Date(targetdate)
this.timesup=false
this.updateTime()
}
cdtime.prototype.updateTime=function(){
var thisobj=this
this.currentTime.setSeconds(this.currentTime.getSeconds()+1)
setTimeout(function(){thisobj.updateTime()}, 1000) //update time every second
}
cdtime.prototype.displaycountdown=function(baseunit, functionref){
this.baseunit=baseunit
this.formatresults=functionref
this.showresults()
}
cdtime.prototype.showresults=function(){
var thisobj=this
var timediff=(this.targetdate-this.currentTime)/1000 //difference btw target date and current date, in seconds
if (timediff<0){ //if time is up
this.timesup=true
this.container.innerHTML=this.formatresults()
return
}
var oneMinute=60 //minute unit in seconds
var oneHour=60*60 //hour unit in seconds
var oneDay=60*60*24 //day unit in seconds
var dayfield=Math.floor(timediff/oneDay)
var hourfield=Math.floor((timediff-dayfield*oneDay)/oneHour)
var minutefield=Math.floor((timediff-dayfield*oneDay-hourfield*oneHour)/oneMinute)
var secondfield=Math.floor((timediff-dayfield*oneDay-hourfield*oneHour-minutefield*oneMinute))
if (this.baseunit=="hours"){ //if base unit is hours, set "hourfield" to be topmost level
hourfield=dayfield*24+hourfield
dayfield="n/a"
}
else if (this.baseunit=="minutes"){ //if base unit is minutes, set "minutefield" to be topmost level
minutefield=dayfield*24*60+hourfield*60+minutefield
dayfield=hourfield="n/a"
}
else if (this.baseunit=="seconds"){ //if base unit is seconds, set "secondfield" to be topmost level
var secondfield=timediff
dayfield=hourfield=minutefield="n/a"
}
this.container.innerHTML=this.formatresults(dayfield, hourfield, minutefield, secondfield)
setTimeout(function(){thisobj.showresults()}, 1000) //update results every second
}
/////CUSTOM FORMAT OUTPUT FUNCTIONS BELOW//////////////////////////////
//Create your own custom format function to pass into cdtime.displaycountdown()
//Use arguments[0] to access "Days" left
//Use arguments[1] to access "Hours" left
//Use arguments[2] to access "Minutes" left
//Use arguments[3] to access "Seconds" left
//The values of these arguments may change depending on the "baseunit" parameter of cdtime.displaycountdown()
//For example, if "baseunit" is set to "hours", arguments[0] becomes meaningless and contains "n/a"
//For example, if "baseunit" is set to "minutes", arguments[0] and arguments[1] become meaningless etc
function formatresults(){
if (this.timesup==false){//if target date/time not yet met
var displaystring=arguments[0]+" days "+arguments[1]+" hours "+arguments[2]+" minutes "+arguments[3]+" seconds left until December 25, 2011 18:25:00"
}
else{ //else if target date/time met
var displaystring=""
}
return displaystring
}
function formatresults2(){
if (this.timesup==false){ //if target date/time not yet met
var displaystring="<span class='lcdstyle'>"+arguments[0]+" <sup>days</sup> "+arguments[1]+" <sup>hours</sup> "+arguments[2]+" <sup>minutes</sup> "+arguments[3]+" <sup>seconds</sup></span> "
}
else{ //else if target date/time met
var displaystring="" //Don't display any text
alert("Christmas is here!") //Instead, perform a custom alert
}
return displaystring
}
</script>
<h1 style="color:#0080ff; margin:0;">Happy Holidays!</h1>
<div id="countdowncontainer"></div>
<br />
<div id="countdowncontainer2"></div>
<script type="text/javascript">
var futuredate=new cdtime("countdowncontainer", "March 23, 2009 18:25:00")
futuredate.displaycountdown("days", formatresults)
var currentyear=new Date().getFullYear()
//dynamically get this Christmas' year value. If Christmas already passed, then year=current year+1
var thischristmasyear=(new Date().getMonth()>=11 && new Date().getDate()>25)? currentyear+1 : currentyear
var christmas=new cdtime("countdowncontainer2", "December 25, "+thischristmasyear+" 0:0:00")
christmas.displaycountdown("days", formatresults2)
</script>
How To add Christmas Countdown widget ?
- Go To Blogger > Design
- Choose HTML/JavaScript widget
- Paste the following code inside it,
<style style="text/css">
.lcdstyle{ /*Example CSS to create LCD countdown look*/
background-color:fff;
color:#FF3333;
font: bold 20px arial;
padding: 15px;
border:5px solid #0080ff;
border-radius:15px;
-moz-border-radius:15px;
-webkit-border-radius:15px;
box-shadow: 5px 5px 5px #CCCCCC;
}
.lcdstyle sup{ /*Example CSS to create LCD countdown look*/
font-size: 120%
}
</style>
<script type="text/javascript">
/***********************************************
* Dynamic Countdown script- © Dynamic Drive (http://www.dynamicdrive.com)
* This notice MUST stay intact for legal use
* Visit http://www.dynamicdrive.com/ for this script and 100s more.
***********************************************/
function cdtime(container, targetdate){
if (!document.getElementById || !document.getElementById(container)) return
this.container=document.getElementById(container)
this.currentTime=new Date()
this.targetdate=new Date(targetdate)
this.timesup=false
this.updateTime()
}
cdtime.prototype.updateTime=function(){
var thisobj=this
this.currentTime.setSeconds(this.currentTime.getSeconds()+1)
setTimeout(function(){thisobj.updateTime()}, 1000) //update time every second
}
cdtime.prototype.displaycountdown=function(baseunit, functionref){
this.baseunit=baseunit
this.formatresults=functionref
this.showresults()
}
cdtime.prototype.showresults=function(){
var thisobj=this
var timediff=(this.targetdate-this.currentTime)/1000 //difference btw target date and current date, in seconds
if (timediff<0){ //if time is up
this.timesup=true
this.container.innerHTML=this.formatresults()
return
}
var oneMinute=60 //minute unit in seconds
var oneHour=60*60 //hour unit in seconds
var oneDay=60*60*24 //day unit in seconds
var dayfield=Math.floor(timediff/oneDay)
var hourfield=Math.floor((timediff-dayfield*oneDay)/oneHour)
var minutefield=Math.floor((timediff-dayfield*oneDay-hourfield*oneHour)/oneMinute)
var secondfield=Math.floor((timediff-dayfield*oneDay-hourfield*oneHour-minutefield*oneMinute))
if (this.baseunit=="hours"){ //if base unit is hours, set "hourfield" to be topmost level
hourfield=dayfield*24+hourfield
dayfield="n/a"
}
else if (this.baseunit=="minutes"){ //if base unit is minutes, set "minutefield" to be topmost level
minutefield=dayfield*24*60+hourfield*60+minutefield
dayfield=hourfield="n/a"
}
else if (this.baseunit=="seconds"){ //if base unit is seconds, set "secondfield" to be topmost level
var secondfield=timediff
dayfield=hourfield=minutefield="n/a"
}
this.container.innerHTML=this.formatresults(dayfield, hourfield, minutefield, secondfield)
setTimeout(function(){thisobj.showresults()}, 1000) //update results every second
}
/////CUSTOM FORMAT OUTPUT FUNCTIONS BELOW//////////////////////////////
//Create your own custom format function to pass into cdtime.displaycountdown()
//Use arguments[0] to access "Days" left
//Use arguments[1] to access "Hours" left
//Use arguments[2] to access "Minutes" left
//Use arguments[3] to access "Seconds" left
//The values of these arguments may change depending on the "baseunit" parameter of cdtime.displaycountdown()
//For example, if "baseunit" is set to "hours", arguments[0] becomes meaningless and contains "n/a"
//For example, if "baseunit" is set to "minutes", arguments[0] and arguments[1] become meaningless etc
function formatresults(){
if (this.timesup==false){//if target date/time not yet met
var displaystring=arguments[0]+" days "+arguments[1]+" hours "+arguments[2]+" minutes "+arguments[3]+" seconds left until December 25, 2011 18:25:00"
}
else{ //else if target date/time met
var displaystring=""
}
return displaystring
}
function formatresults2(){
if (this.timesup==false){ //if target date/time not yet met
var displaystring="<span class='lcdstyle'>"+arguments[0]+" <sup>days</sup> "+arguments[1]+" <sup>hours</sup> "+arguments[2]+" <sup>minutes</sup> "+arguments[3]+" <sup>seconds</sup></span> "
}
else{ //else if target date/time met
var displaystring="" //Don't display any text
alert("Christmas is here!") //Instead, perform a custom alert
}
return displaystring
}
</script>
<h1 style="color:#0080ff; margin:0;">Happy Holidays!</h1>
<div id="countdowncontainer"></div>
<br />
<div id="countdowncontainer2"></div>
<script type="text/javascript">
var futuredate=new cdtime("countdowncontainer", "March 23, 2009 18:25:00")
futuredate.displaycountdown("days", formatresults)
var currentyear=new Date().getFullYear()
//dynamically get this Christmas' year value. If Christmas already passed, then year=current year+1
var thischristmasyear=(new Date().getMonth()>=11 && new Date().getDate()>25)? currentyear+1 : currentyear
var christmas=new cdtime("countdowncontainer2", "December 25, "+thischristmasyear+" 0:0:00")
christmas.displaycountdown("days", formatresults2)
</script>
How To change Colours.
- To change the color of happy holidays edit color:#0080ff
- To change the rounded blue border colour and size edit border:5px solid #0080ff
- To change the Count Down text colour edit color:#FF3333
4. Save your widget and say yoho!
Visit your blogs to see it working just perfectly.
Want to CountDown till New Year?
Simply change December 25 to December 31 and change Christmas is here! to HAPPY NEW YEAR!
If you know basic CSS then you add more flavour and color variation to it. I hope you may find this cool new widget worth using. If you wish to share it with your readers then kindly attach attributes to MBT and dynamic drive.
Please Share This To Your Friends !


